Image of the Month
A New Frontier - CCD IMAGING
After Land of Oz Observatory became operational in September of 2003, my observing activities really took off. During every new moon cycle I tried to spend at least one night down at Oz in my continued pursuit of faint deep sky objects. And, having a separate "warm room" with a cot and sleeping bag, I could make each visit to Oz an "all nighter" - observing until the wee hours of the morning and then grabbing a few hours of sleep before heading home the next day. And having a desk where I could sit in comfort and consult my detailed sky atlases (Tirion's "Sky Atlas 2000" and "The Millenium Sky Atlas") and the MegaStar planetarium program on my laptop computer, greatly aided my search for fainter fuzzies. In the spring of 2004, I equipped my Celestron C-11 with an 80mm correct image finder. This allowed me to easily compare the finder's field of view with the star patterns shown on the "Millenium Sky Atlas" charts, which showed stars down to 9th magnitude.
In February of 2005, I made a major upgrade to the telescope: I purchased a new Mountain Instruments MI-250 Go-To German Equatorial mounting. The go-to capabilities of this mount when running it in conjunction with the Software Bisque "The Sky 6" planetarium program made it possible to precisely slew to faint objects and have them centered, even in the smaller field of a high powered eyepiece.
Early in 2006 an observing buddy of mine, Dave Hudgins, began emailing me images that he was taking with a small 4-inch f/4.5 reflector using a new low-priced one-shot color CCD camera being offered by Orion. The images were quite nice, considering the budget equipment they were acquired with. I went over to Dave's house one night to see the setup that had produced these images. He had the little 4-inch piggybacked on his 10" SCT, and was taking 30 to 60 second exposures without guiding. When I learned that the little reflector cost under $250, and the CCD camera was only $400, wheels started turning in my brain. It made me recall the images that I had taken back in 1999 when I observed with Adam Block at Kitt Peak in their Advanced Observing Program. Based on the results that Dave Hudgins had achieved, I decided to "take the plunge" and invest in a low-cost CCD imaging setup.
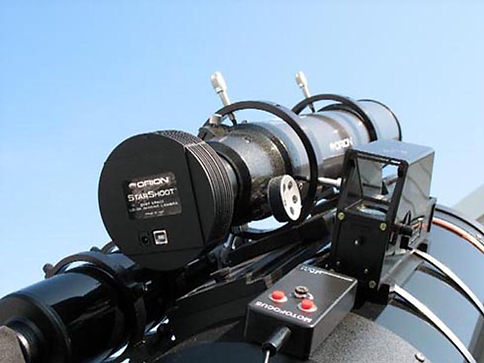
I paid a visit to a local astronomy store, and discovered that they had a very good inventory of ORION products on hand, including the little STARSHOOT DEEPSKY CCD CAMERA! I ended up purchasing an ORION 80mm f/7 APO refractor and a STARSHOOT camera. I then contacted LOSMANDY and ordered a set of 150mm heavy duty rings and a dovetail plate to attach them to my C-11. Photos of the dovetail and ring mounting and the 80mm scope and camera are below:

LOSMANDY Dovetail and 150mm Rings

STARSHOOT CAMERA & 80MM REFRACTOR
By the spring of 2006 I had the 80mm APO refractor piggy-backed and aligned with the C-11, and had installed the STARSHOOT camera and Maxim Essentials camera software and checked out all the connections to verify functionality. I was now ready to take my first CCD image!
Finally, on the evening of May 26th, I slewed the scope to the globular cluster M-3 in Canes Venatici, and centered it in the 140X field of the C-11. I then removed the lens cap of the 80mm ORION refractor, opened the Maxim camera control and connected the STARSHOOT camera. I then took a 10 second test exposure of M-3.
Imagine my excitement when the image downloaded to the screen of my laptop! There it was! M-3 was actually centered on the chip, and I could see that the cluster was very nearly in focus. I took several more 10 second exposures while tweaking the focus, until the stars appeared as pinpoints when viewed at 100X. I then proceeded to shoot some 30 second exposures of M-3, but in my haste, I had forgotten to check the camera settings. In the Maxim Essentials program, there are two camera setting options: Color and Raw. I had not read far enough in the manual to realize that in order to properly stack and calibrate the images, they had to be taken in the RAW mode. Not knowing this at the time, I proceeded to take twenty 30-second images to stack for an integrated image. Only the next day did I discover my error when I tried to calibrate the images. Because they were shot in the COLOR mode, I could not use the "log stretch" function to bring out all the depth in the integrated image. All I could do was use the simple "Screen Stretch", and this limited how much I could bring out the fainter stars without "blowing out" the core of the globular cluster. Nevertheless, I was absolutely thrilled that my first CCD image showed more detail in M-3 with a 10 minute integration than I had been able to get with a 30 minute exposure using film in my SLR camera! In spite of my mistake, I could see that CCD imaging was going to be an exciting new endeavor, and I was on my way!! My "first light" image of M-3 is shown below:
